You do not need to be a designer to brief custom packaging. You do need to understand the language: dielines, bleed zones, color modes, file formats, and the proof process. This guide walks through everything a non-designer founder needs to know to brief custom packaging with confidence. If you are still choosing a box style first, start with our custom packaging guide.
What is a dieline
A dieline is the flat vector outline of your unfolded box. It includes every cut line, every fold score, and every glue tab. When you see a flat layout of a box that looks like a stretched out cross or a star, that is a dieline.
The dieline is the foundation for all your printed artwork. Your logo, your product photos, your brand colors, your barcode, all of it sits on top of the dieline. Without the dieline, the print would not align with the box edges and folds.
Every custom box style has a different dieline. A mailer box dieline looks different from a rigid box dieline. A window box dieline includes the die cut window outline. The first thing your packaging supplier does after you send dimensions is build the dieline. If you have not settled on a format yet, our box styles guide covers all eight before you lock in a dieline.
At MetaSys we send you the dieline free with every quote, both as a PDF for you to review and as an editable vector file for your designer to work on.
Bleed and safe zones
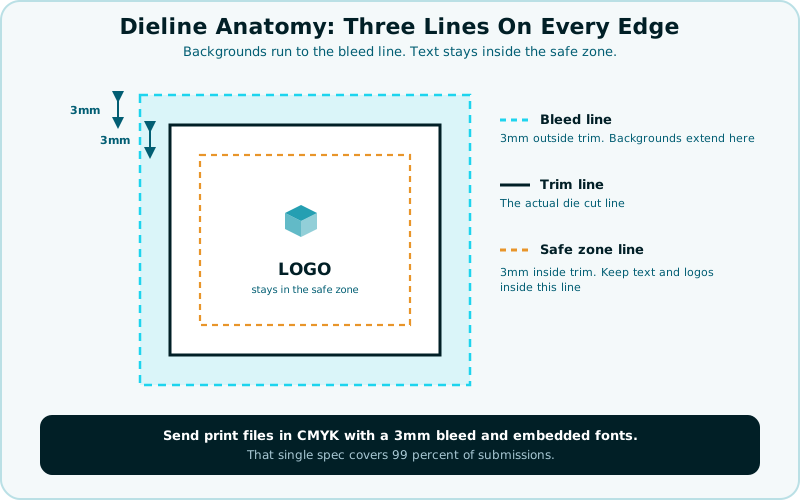
Bleed is the area of artwork that extends past the cut line of the box. Without bleed, slight cut variations during production leave thin white slivers along the edges of your printed box. Industry standard bleed is 3 mm beyond the cut line on every edge.
Safe zone is the area inside the cut line where important elements like text, logos, and barcodes should stay. Anything outside the safe zone risks getting trimmed off during die cutting. Industry standard safe zone is 3 mm inside the cut line.
In practical terms, your dieline has three lines on every edge:
- Trim line (the actual cut line)
- Bleed line (3 mm outside the trim line)
- Safe zone line (3 mm inside the trim line)
Backgrounds extend all the way to the bleed line. Text and logos sit inside the safe zone line. Most printers expect art files with all three lines on a separate layer.
CMYK versus RGB
This is the single most common file mistake we see from non-designers.
RGB stands for Red Green Blue. It is the color mode for screens, monitors, phones, websites, and any other digital display. RGB colors look vivid and bright because screens emit light.
CMYK stands for Cyan Magenta Yellow Black (Key). It is the color mode for printing. CMYK colors are produced by combining four ink colors on a substrate. CMYK colors print darker and slightly duller than RGB looks on screen.
If you send a print file in RGB mode, the printer converts it to CMYK automatically. The conversion can shift colors unpredictably, especially in bright blues and reds that exist in RGB but cannot be reproduced exactly in CMYK.
Always convert your design to CMYK before sending it to the printer. Adobe Illustrator and Photoshop both have one click conversion. The conversion is not reversible without quality loss, so save a backup of your RGB file first.
Pantone colors
Pantone is a spot color system where exact ink colors are mixed before printing instead of being built from CMYK percentages. A Pantone 7732 C green is the same exact green on every print job, every printer, every substrate.
Pantone is used when brand color consistency matters more than flexibility. A brand that prints across many vendors and many substrates uses Pantone to keep its colors recognizable across all of them.
Pantone supports two main libraries:
- Pantone Solid Coated (PMS coated) for use on coated paper substrates like SBS and CRB
- Pantone Solid Uncoated (PMS uncoated) for use on uncoated paper substrates like kraft
The same Pantone number prints slightly differently on coated versus uncoated stock. The C and U designations exist to specify which version to use, and the right call usually follows from your paperboard or corrugated substrate rather than the other way around.
Spot Pantone colors cost more than CMYK on offset printing because each spot color requires its own plate and its own pass through the press. Digital printing simulates Pantone within a Delta E of 3 to 5 for most colors, which is commercial standard but not exact.
If your brand depends on exact color matching, specify Pantone Solid Coated codes and request offset printing.
File formats accepted by printers
Most packaging printers accept the following file formats:
- AI (Adobe Illustrator native) is the gold standard for vector artwork
- PDF with vector elements and embedded fonts is the most common interchange format
- EPS is an older vector format still accepted for legacy work
- PSD (Adobe Photoshop) for raster heavy designs
- TIFF for high resolution raster images
- PNG and JPG at 300 dpi minimum for raster only designs
Avoid:
- Word documents which are not print ready
- PowerPoint which loses fidelity on conversion
- Canva exports unless exported as PDF print with bleed enabled
- Screenshots of any kind at any resolution
When in doubt, send PDF with vector artwork, embedded fonts, CMYK color mode, and a 3 mm bleed on every edge. That covers 99 percent of submissions.
Inside printing
Inside printing means artwork printed on the inside of the box, visible when the customer opens it. For folding cartons and rigid boxes the inside print becomes a backdrop or reveal moment.
Inside printing adds 30 to 40 percent to per unit cost over outside-only printing. The reason: the print runs through a second pass on the press, which means more setup, more time, and more material handling.
For mailer boxes in ecommerce, inside printing is one of the highest impact unboxing upgrades available, since it turns a moment the customer is already photographing into a branded one.
If you do inside printing, design it specifically for the inside view. The fold pattern is different on the inside than the outside. Tab placement is different. Logo placement that looks good on the outside looks awkward on the inside.
Foil stamping and embossing placement
Foil stamping presses a metallic foil into the paperboard surface in a specific shape. Gold, silver, copper, and holographic foils are most common.
Embossing presses the paperboard upward to create a raised tactile element. Debossing presses it downward to create a recessed element.
Both work best on simple shapes: logos, brand marks, and short headlines under 20 characters. Both struggle with:
- Fine type below 8 point which the press cannot resolve cleanly
- Detailed photographs which lose definition under the foil layer
- Complex backgrounds that compete with the foil for visual attention
The rule of thumb: foil and emboss the brand mark, nothing else. Resist the temptation to foil every interesting element. Restraint reads as premium. Excess reads as cluttered.
Working with our design team
We provide structural dieline design free with every quote. We also produce a 3D mockup of your printed design at no cost so you can see the finished box before going into production.
If you have an in house or contracted designer, we send them the editable dieline file. They lay your artwork on top of it and send us back the print ready file.
If you do not have a designer, we offer a full graphic design service at a flat fee. The fee depends on the complexity of your project, ranging from a simple one-color logo placement to a full multi-panel brand system across several box faces. We always quote design separately so you can decide whether to use our team or your own. See how much custom packaging actually costs for how design fees fit into your overall packaging budget.
The free 3D mockup process
After you submit a quote and approve the dieline, our team builds a 3D mockup of your printed box in our design software. The mockup shows what the finished box will look like from every angle, including:
- Outside print as it will appear after printing and finishing
- Inside print if applicable
- Material texture with proper rendering of soft touch, matte, gloss, or foil
- Box dimensions at correct scale
You review the mockup digitally and request changes until you are 100 percent satisfied. Only after you approve the mockup does the job go into production. This eliminates the most expensive packaging mistake: producing 5,000 units before realizing the design is wrong.
The 3D mockup is free with every quote.
Common design mistakes to avoid
The mistakes we fix most often on customer files:
- Logo placed inside the safe zone is OK but logo touching the cut line gets trimmed off
- Background colors that stop at the trim line instead of extending into the bleed leave white slivers after die cutting
- Text below 6 point on small panels is unreadable after printing
- Photo backgrounds at less than 300 dpi look pixelated when printed
- Dieline placed on top of artwork instead of on a separate layer makes the file unusable
We catch these issues during the proof review process and request fixes before production. The catch is that fixes require sending the file back and forth, which adds time to the project. Catching them upfront saves 2 to 5 business days on production timeline.
Submission checklist
Before you send your art file to the printer:
- File format is PDF, AI, or EPS with vector elements
- Color mode is CMYK
- Pantone colors are specified by number if used
- Bleed is 3 mm on every edge with background extending fully into bleed
- Safe zone of 3 mm is respected with no critical elements outside it
- Fonts are embedded or outlined
- Images are 300 dpi or higher
- Dieline is on a separate layer
- File is named clearly with project, version, and date
This checklist catches nearly every recurring issue we see during proofing.
A few more design questions before you submit art
How do I measure my product to build an accurate dieline? Measure at the widest, deepest, and tallest points, including caps, pumps, handles, or anything that protrudes. Add clearance if the product needs an insert or void fill. Send those measurements with your quote request and we build the dieline from them. Our step-by-step measuring guide covers irregular shapes and multi-item kits in more detail.
Which printing method should I choose for my box design? Digital printing has no plate setup cost and makes sense under 500 units. Offset printing needs a plate but drops per unit cost sharply above 500 units, which matters more as your run grows. Flexographic printing runs best on corrugated and kraft at 1,000 units or more. Our printing methods guide breaks down when each one earns its cost.
How much does a full design service cost beyond the free dieline and mockup? The structural dieline and 3D mockup are free with every quote, regardless of whether you use our design team. A full graphic design engagement, where we build your artwork from scratch, is quoted separately based on project complexity, and we always give you that number before you commit to it.
Get a free design mockup
Send us your product dimensions and your artwork (or just your logo if you do not have packaging artwork yet). We build the dieline and a 3D mockup of your printed box free with every quote. You see exactly what it will look like before we produce a single unit.