Getting a custom box quote is straightforward once you have three numbers ready: length, width, and height. What trips up most buyers is not knowing which numbers to measure, or what to add around those numbers for product fit and protection. Send the wrong dimensions and you end up with a box too tight to close, or one so oversized it shifts during transit and arrives with a dented corner.
This guide covers exactly how to measure, what allowances to add, how to account for inserts and dunnage, and what to include when you request a custom packaging quote. If you want context on the broader material choices that affect sizing and cost, the packaging materials guide is a good companion read.
Interior versus exterior dimensions
Every box has two sets of dimensions. The distinction matters more than most buyers expect.
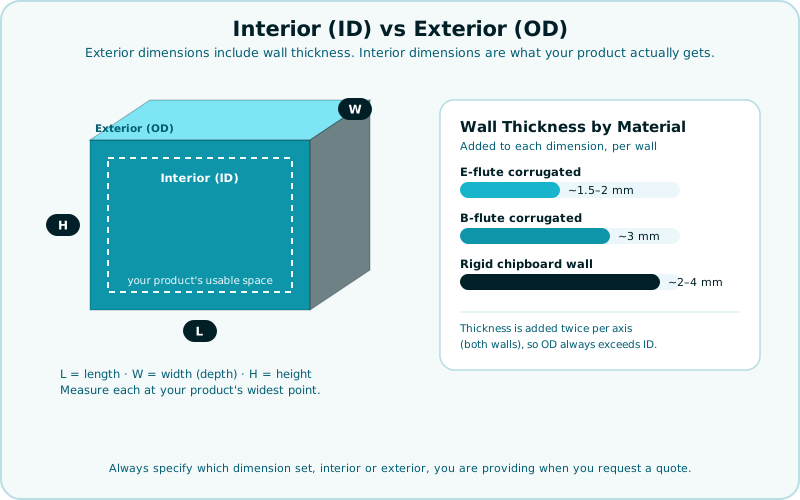
Interior dimensions (also called inside dimensions or ID) are the usable space inside the finished box. This is the measurement that has to work for your product. When you size a box, you are sizing for the interior.
Exterior dimensions (also called outside dimensions or OD) are what the finished box actually occupies in space and on a shipping label. Exterior dimensions are larger than interior dimensions because they include the wall thickness of the corrugated or paperboard material.
Wall thickness varies by material and flute grade. E-flute corrugated runs roughly 1.5 to 2 mm per wall. B-flute runs closer to 3 mm per wall. On a six-sided box that is 3 to 6 mm added to each dimension. On rigid boxes, the chipboard lid and base walls are thicker still, typically 2 to 4 mm each.
When your carrier calculates dimensional weight or when you are designing a shipper to hold a set number of units, you need exterior dimensions. When you are deciding whether your product fits with appropriate clearance, you work from interior dimensions.
Always specify which dimension set you are providing when you submit a quote request.
How to take the right measurements
Use a rigid ruler or calipers, not a flexible tape measure. Flexible tape shifts and adds 2 to 5 mm of error across a single measurement. For products under 6 inches in any direction, calipers give you the most reliable reading.
Measure your product at its widest, deepest, and tallest points. Include any protrusions: button assemblies, cap lips, label wrap seams, handle hardware. The box interior must clear everything.
The standard industry notation for box dimensions is:
L x W x H
Where:
- L (Length) is the longest horizontal dimension of the box opening
- W (Width) is the shorter horizontal dimension of the box opening
- H (Height) is the vertical dimension, how tall the box stands when closed
This matches the notation used by corrugated manufacturers and most box type suppliers. When in doubt, write out which number refers to which dimension and include a rough sketch in your quote request. Our team reviews every quote manually and will confirm measurements before production.
Clearance allowances by product type
Your interior box dimension should not match your product dimension exactly. You need clearance: room for the product to sit without stress, room for protective inserts, and tolerance for the natural variation in how corrugated and chipboard are cut.
A general framework for minimum clearances on each side:
| Product Category | Minimum Clearance per Side | Notes |
|---|---|---|
| Rigid, non-fragile (books, candles, apparel) | 6 to 10 mm | Snug fit is fine with no insert |
| Fragile (glass, ceramics, electronics) | 25 to 50 mm | Needs foam, pulp, or corrugated insert |
| Bottles and jars (full) | 12 to 20 mm | Liquid weight shifts on impact; add buffer |
| Multi-unit retail pack | 8 to 15 mm per unit | Account for all units plus dividers |
| Subscription/gift sets | 15 to 25 mm | Room for tissue, filler, cards |
Clearance applies to all four sides and the top. The bottom clearance is handled by the insert layer. Do not add clearance to the bottom measurement and then double-count it in your insert thickness.
For fragile categories specifically, clearance is only part of the equation. Insert type and flute grade matter just as much as the number on the tape measure. See our guide to choosing packaging for fragile products for the full protection framework.
Accounting for inserts and dunnage
If your product needs interior protection, the insert takes up interior space. Measure the insert in its installed position, then confirm the remaining cavity fits your product.
Common insert types and their space implications:
- Custom foam inserts: Cut to product shape. Foam compresses slightly under load. For a snug foam cradle, spec the foam cavity 2 to 3 mm smaller than the product in each direction so the foam grips without cracking. Total insert thickness typically 12 to 50 mm.
- Molded pulp trays: Rigid and precise. Spec the cavity to product dimensions with 1 to 2 mm release draft. Trays add 3 to 6 mm to the floor height.
- Corrugated dividers: Flat inserts that separate multiple units. Each divider is typically 3 to 4 mm thick. Add one divider thickness per internal partition.
- Void fill (tissue, crinkle paper, air pillows): Not structural, but adds 15 to 30 mm to the box height if layered on top of the product. Account for this when sizing height.
For fragile product boxes or rigid boxes with foam or pulp inserts, submit the insert spec alongside the product measurement. We build the box around both.
Right-sizing and why it saves real money
A box that is 20 percent too large in any dimension does not just look sloppy. It costs you in three places.
Material cost scales directly with box dimensions. A box that is 1 inch wider, 1 inch deeper, and 1 inch taller than necessary uses measurably more paperboard per unit. At volume, those extra square inches compound.
Shipping cost is driven by dimensional weight on most domestic carriers. Dimensional weight = (L x W x H) / 139 for most UPS and FedEx ground shipments (in inches). If your dimensional weight exceeds your actual weight, you pay the dimensional rate. A box sized correctly to your product can drop you an entire weight tier.
Damage rate goes up, not down, in oversized boxes. A product that moves inside its box is a product that absorbs impacts instead of transferring them to the box walls. Snug, right-sized packaging with appropriate inserts outperforms an oversized box with void fill at the same price point.
For a deeper look at how packaging decisions affect your landed cost per unit, the guide to reducing packaging costs covers the full picture.
What dimensions to include in your quote request
When you submit a quote, give us the following:
- Product interior dimensions: L x W x H at the widest point of each axis
- Product weight: Per unit and per set if multi-unit
- Insert type: Foam, pulp tray, dividers, tissue, or none
- Insert thickness: If known; we can recommend if not
- Quantity: Units per run (minimum 50 units for most styles)
- Box style: Mailer box, rigid box, product box, shipping carton, gable box, window box, or other from the full catalog
- Preferred clearance: Snug, standard, or padded (fragile items)
If you are not sure on box style or clearance, say so. Our team has sized boxes across every product category we serve, from health and wellness supplements to tech electronics. Reviewing dimensions and recommending spec is part of the quoting process, not an upsell.
The free 3D mockup confirms fit before production
After we receive your dimensions and confirm spec, we build a 3D digital mockup of your box at no cost. The mockup shows interior dimensions, exterior footprint, print placement, and how the box opens and closes. You can review it before any material is cut.
This is the step that catches measurement errors: a box that was dimensioned against the product without accounting for an insert, or a height that assumed tissue paper would compress to nothing. Catching it at mockup costs nothing. Catching it after production is expensive.
We send the mockup within 48 business hours of receiving your quote details.
Measuring questions we hear most
How does box sizing interact with Amazon FBA's oversize limits? If you sell on FBA, exterior box dimensions determine your fee tier, not just interior fit. Amazon's oversize threshold sits at 18 inches on the longest side or 20 lbs per unit. Size your box to the tightest interior clearance your product allows, since every extra half-inch on the exterior can push a borderline unit into the oversize tier. Our Amazon FBA packaging guide covers the full compliance picture, from FNSKU labels to master carton prep.
What clearance should I use for glass or ceramic products specifically? Glass and ceramics need 25 to 50 mm of clearance per side at minimum, filled with a foam, pulp, or corrugated insert rather than left open, as noted in the clearance table above. The clearance number alone does not protect the product; it only creates room for an insert to do the actual work of absorbing impact.
Which printing method should I choose once dimensions are finalized? Dimensions and printing are separate decisions, but run quantity connects them. Under 500 units, digital printing keeps setup cost low. Above that on folding carton, offset usually wins on a per-unit basis. Our printing methods guide breaks down offset, digital, and flexo by run size and substrate.
Getting started
Measure your product at its widest point in each axis. Add your clearance and insert allowance. Note the box style that fits your use case. Then request a quote with those numbers. If you want to hold the physical box before committing to a production run, you can request a sample first. The sample fee credits toward your first production order.
For brands that want to understand the structural and print options available across box styles before settling on dimensions, the guide to designing custom boxes covers dielines, material spec, and print file requirements in full.